|
Make Your Own Saltwater Fishing Spoons
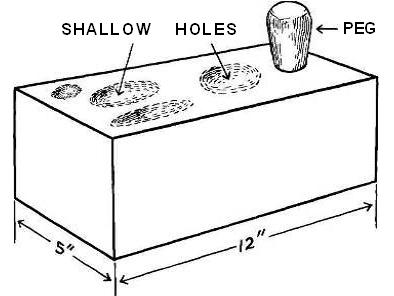
For pounding and shaping saltwater fishing spoons you need a wooden anvil, which is nothing but a rectangular block of wood. Any block of hard wood such as oak or Douglas fir, about 12 in. long and 5 or 6 in. thick, is suitable. Toward one end of the block, drill a big hole and insert a peg of hard wood. You can also dig out some shallow holes and grooves along the working faces of the wood block. See illustration below.
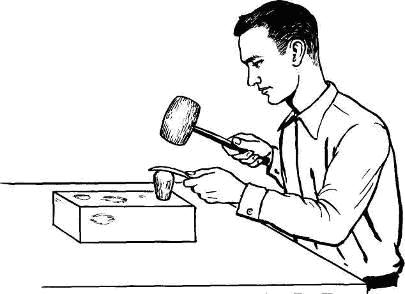
When shaping a spoon lay the sheet metal on the peg or over the shallow holes and pound it with a wooden mallet. See illustration below.
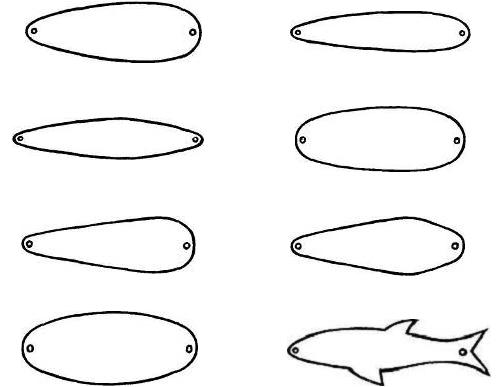
As an aid in shaping the metal, make some punches out of hard wood. The sheet metal is placed over the hole or groove on the wood block and the punch is held at the spot where you want the metal to be formed. Then strike the wood punch with the mallet to shape the spoon. The metal for making spoons can be sheet brass, copper, or stainless steel. Stainless steel is being used more and more, and is especially suitable for saltwater fishing spoons because it doesn't corrode or tarnish. But stainless steel, especially in the heavier gauges, is very hard and springy and tough to work with hand tools. If you have a workshop with power tools you can work with stainless steel. But if you do not have power tools and must use hand tools, you'll find it easier to work with brass, copper, or other soft metals. Spring brass is a good metal and if you obtain sheets of this material in 1/32 in. thickness you'll be able to make varied sizes of saltwater fishing spoons. Of course, slightly lighter gauges can be used for the smaller spoons and heavier gauges are more suitable for the larger spoons. The metal used should have enough spring so that it doesn't bend out of shape too readily when a big fish is hooked. The first step in making saltwater fishing spoons is to draw and cut out a pattern of the shape and size you want from a piece of cardboard or heavy paper. This way, all your spoons will be uniform in size and you don't have to make a new drawing to follow each time. Then trace the pattern outline on the sheet metal. The lighter gauges of brass or copper can be cut with ordinary hand snips, and the heavier gauges can be cut with aviation snips. The duck bill snips are best for cutting the curves. You can also use a hacksaw or other metal saw to remove excess metal. When cutting out the spoons the best procedure is to cut just outside the tracing, leaving some metal. In other words, cut the spoon slightly larger in size than the finished one will be. Then file the spoon down to the finished size. The shape and size of the spoon will depend, of course, on the type of fishing you do, the weight desired, and the size of the fish to be caught. The blade can be long and narrow, bigger at the head or at the tail. It can be short and broad and rounded at both ends, or you can shape it like a fish, with two fins and a tail. You can take almost any spoon and make a duplicate of it, or you can design your own. The illustration below shows some of the different shapes which can be used when making saltwater fishing spoons.
Two basic types are usually made for saltwater fishing spoons. One is based on the principle of the reverse S curve. See illustration below.
Here the spoon is curved in one direction at the head and in the opposite direction at the tail. Both the head and tail are also hollowed or dished. The type of action you want will depend on how much of a curve you give the spoon. A spoon with a slight curve will have a somewhat faster wobble or wriggle than one which has extreme curves. The spoon with sharp curves and deep hollows will have more throw or sway when reeled or trolled. Naturally, experimentation will show just how much to curve or dish a spoon. Before you shape too many spoons, try one out in the water to see if it has the desired action. The other basic type of spoon is the more conventional shape shown below. Here the spoon is curved and dished both from the head to the tail and from side to side.
This type usually is wider at the head and tapers toward the tail. The size of the spoon will depend on the type of fishing you do and the fish you seek. Small spoons measuring only 3 or 4 in. long are best for casting and trolling for small saltwater fish. Medium-sized spoons from 4 to 8 in. can be cast with heavier outfits or trolled for bigger fish. Some of the larger spoons, such as the so-called "bunker" spoons, run up to 12 in. in length and are used for big fish such as striped bass. The hook used on saltwater fishing spoons should be strong enough and heavy enough to hold big fish. A single hook is better than a treble hook. There are various ways to attach the hook to a spoon. The easiest and quickest way is the method usually used on freshwater fishing spoons . You drill one hole in the head and another in the tail, and insert split rings. Then you slip a big single hook on the split ring at the tail. Solid brass split rings should be used for saltwater fishing spoons, and as an added measure of security the rings should be soldered after they are on the spoon. Another strong way to attach a hook is to cut a slot in the tail end of the spoon and insert the hook shank through it. You also drill a hole in the body of the spoon where the eye of the hook falls, insert a small bolt through the hole and the hook eye, and fasten it in place with a nut.
This is shown above. The advantage of this method is that you can quickly remove an old rusted hook and attach a new one, if needed. For best results, use brass hardware to hold the hook. If you use brass or copper sheet metal to make your saltwater fishing spoons you can use them as they are by polishing them. A metal polish which can be bought in any hardware store can be used for this. However, the most effective finish for saltwater is a nickel-plated or chrome-plated spoon. For plating, you have to take the spoons to a shop which does metal plating, and do this before you assemble the spoons. Some anglers also paint their saltwater fishing spoons silver, white, or yellow. Lacquers or enamel can be used for this. Of course, if you made your spoons from stainless steel all you have to do is polish them to a high gloss.
| Back to Top of Saltwater Fishing Spoons |
Make-Your-Own-Fishing-Lures.com © 2004 Make-Your-Own-Fishing-Lures.com. All Rights Reserved.
|


